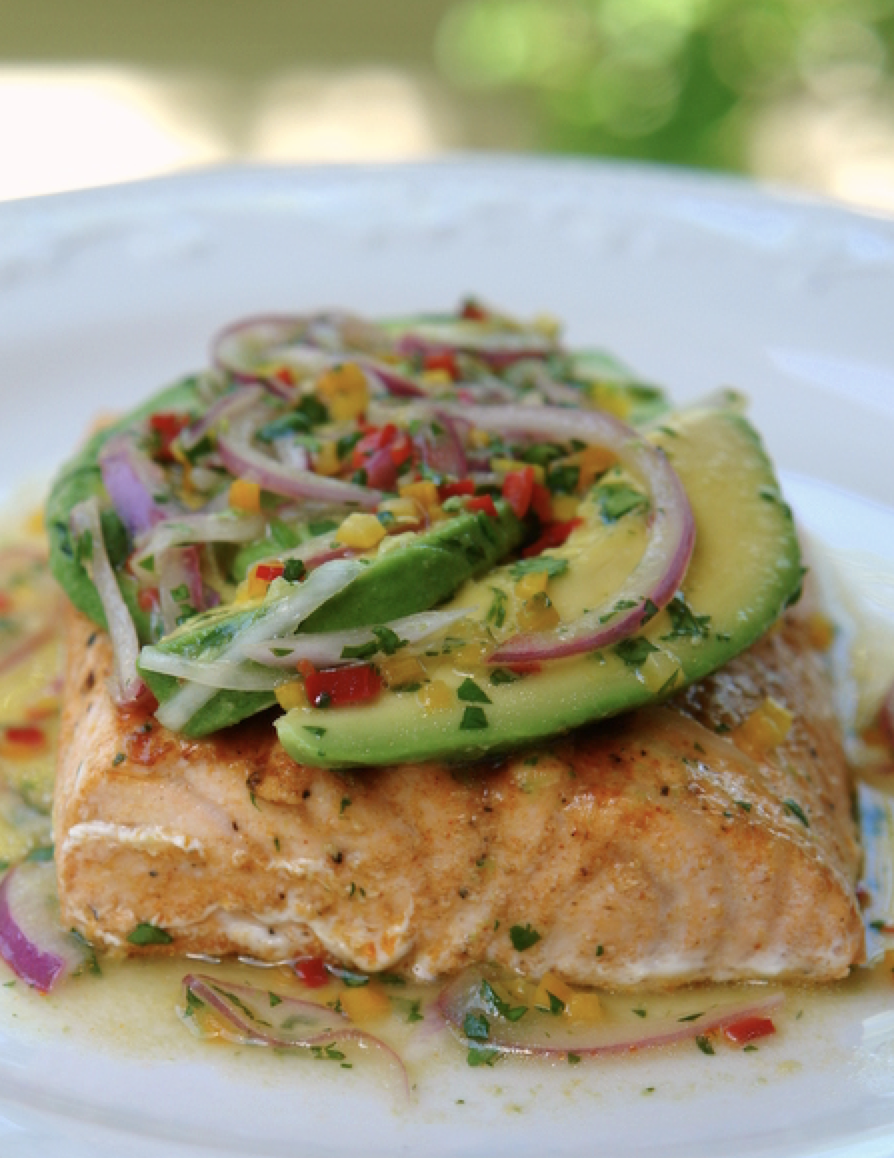
Chewy Oatmeal Chocolate Chip Cookies

There is something about warm oatmeal cookies. I love them. I can’t get enough of them. I’ve been on a quest to find the perfect recipe to satisfy my craving and I think this one is pretty close. These are good. Really good. Enjoy! 🙂

Chewy Chocolate Chip Oatmeal Cookies

Ingredients: (I usually cut this in half)

  • 1 cup butter, softened
  • 1 cup packed light brown sugar
  • 1/2 cup white sugar
  • 2 eggs
  • 2 teaspoons vanilla extract
  • 1 1/4 cups all-purpose flour
  • 1/2 teaspoon baking soda
  • 1 teaspoon salt
  • 3 cups quick-cooking oats
  • 1 cup semisweet chocolate chips (optional! These are excellent without the chocolate)

Directions:

  1. Preheat the oven to 325 degrees.
  2. In a large bowl, cream together the butter, brown sugar, and white sugar until smooth. Beat in eggs one at a time, then stir in vanilla. Combine the flour, baking soda, and salt; stir into the creamed mixture until just blended. Mix in the quick oats and chocolate chips. Drop by heaping spoonfuls onto ungreased baking sheets.
  3. Bake for 12 minutes in the preheated oven. Allow cookies to cool on baking sheet for 5 minutes before transferring to a wire rack to cool completely.

Original recipe available here.

Chocolate Sour Cream Pound Cake

The perfect Christmas dessert. Serve with vanilla ice cream for best results. Enjoy!


Ingredients

  • 2 sticks softened butter
  • 8 oz sour cream
  • 3 cups sugar
  • 6 eggs
  • 1 teaspoon vanilla extract
  • 2 1/4 cups cake flour
  • 1 teaspoon baking powder
  • 3/4 cup unsweetened cocoa powder

Directions

**Let eggs and butter sit out for an hour before you start if possible.

Preheat the oven to 325 °F. Grease and flour a 10-inch Bundt pan generously.

Using an electric mixer, cream together the butter, sour cream and sugar for 5min. Then add the eggs, 1 at a time, beating well after each addition. Add the vanilla.

In another bowl, stir together the flour, baking powder and cocoa. Add 1/2 the flour mixture to the creamed mixture, beat well, add the remaining 1/2 flour mixture, and continue to beat at medium speed for 2 minutes.

Pour the batter into the prepared pan and bake for 1 hour 15 minutes. Continue to bake for an additional 15 minutes if necessary, but do not open the oven to check the cake for at least 1 hour.

Original recipe available HERE.

Best Ever Banana Pudding Pie

So it’s been a long time since I’ve posted… a long time. A “I’ve had a baby since my last post” long time but hey, I’m doing my best. It’s also been a long time since I’ve cooked or baked or done pretty much anything in the kitchen so I was super excited to get busy baking for Christmas. While this may be more appropriate as a summer dessert as opposed to a Christmas pie the taste makes up for the the mismatch in season- its soooo yummy. So enjoy!

Ingredients:
1 9 pinch pie crust, prepped, baked and cooled
2 C chopped vanilla wafers
2 small bananas
1 8oz tub Cool Whip, divided
1½ C milk
1 5.1oz box instant vanilla pudding
juice from one lemon
Caramel sauce for drizzling

Instructions:
Slice the bananas into thin slices and then toss with the lemon juice. The lemon juice will prevent them from turning brown as fast as they normally would.

Prepare the filling. Whisk together the 1½ C milk and pudding mix. Mix in half of the cool whip. Mix in 1 C of the vanilla wafers and then the bananas. Scrape into the cooled crust. Refrigerate for 10-15 minutes or until set.

Top with the remaining Cool Whip, using a rubber spatula. Sprinkle with the remaining vanilla wafers and then drizzle with the caramel sauce.

Original recipe available HERE.

Peanut Butter Cup Cookies

Ingredients (for 16 cookies)

  • ½ cup unsalted butter, melted
  • â…” cup brown sugar
  • 1 egg
  • 1 teaspoon vanilla
  • â…“ cup peanut butter
  • 1 cup flour
  • ½ teaspoon salt
  • ½ teaspoon baking soda
  • 1 cup mini peanut butter cup

Preparation

  1. In a bowl, add the butter and brown sugar, and stir to combine.
  2. Add the egg and mix until fully incorporated.
  3. Stir in the peanut butter and vanilla.
  4. Add the flour, salt, and baking soda.
  5. Gently fold in the peanut butter cups.
  6. Chill dough for at least 1 hour.
  7. Preheat oven to 350ËšF (180ËšC).
  8. Once dough is chilled, scoop out a ball about 2 inches (5 cm) wide. Place on a parchment paper-lined baking sheet, leaving about 2-inches (5 cm) in between each ball of dough.
  9. Bake for 8 to 10 minutes, until bottom edges of cookies are golden.
  10. Let cookies cool. Can be stored in an airtight container up to 5 days.
  11. Enjoy!

Original recipe available HERE.

Best Lasagna Ever

Thanks Tiffany for this delicious meal! Amazing!

INGREDIENTS

  • 1-1/2 pound Ground Beef
  • 1 pound Hot Breakfast Sausage
  • 2 cloves Garlic, Minced
  • 2 cans (14.5 Ounce) Whole Tomatoes
  • 2 cans (6 Ounce) Tomato Paste
  • 2 Tablespoons Dried Parsley
  • 2 Tablespoons Dried Basil
  • 1 teaspoon Salt
  • 3 cups Lowfat Cottage Cheese
  • 2 whole Beaten Eggs
  • 1/2 cup Grated (not Shredded) Parmesan Cheese
  • 2 Tablespoons Dried Parsley
  • 1 teaspoon Salt
  • 1 pound Sliced Mozzarella Cheese
  • 1 package (10 Ounce) Lasagna Noodles
  • (add 1/2 Teaspoon Salt And 1 Tablespoon Olive Oil To Pasta Water)
DIRECTIONS
Bring a large pot of water to a boil.

Meanwhile, in a large skillet or saucepan, combine ground beef, sausage, and garlic. Cook over medium-high heat until browned. Drain half the fat; less if you’re feeling naughty. Add tomatoes, tomato paste, 2 tablespoons parsley, basil and salt. After adding the tomatoes, the sauce mixture should simmer for 45 minutes while you are working on the other steps.

In a medium bowl, mix cottage cheese, beaten eggs, grated Parmesan, 2 more tablespoons parsley, and 1 more teaspoon salt. Stir together well. Set aside. Cook lasagna until “al dente” (not overly cooked).

To assemble:
Arrange 4 cooked lasagna noodles in the bottom of a baking pan, overlapping if necessary. Spoon half the cottage cheese mixture over the noodles. Spread evenly. Cover cottage cheese with a layer of mozzarella cheese. Spoon a little less than half the meat/sauce mixture over the top.

Repeat, ending with meat/sauce mixture. Sprinkle top generously with extra Parmesan.

Either freeze, refrigerate for up to two days, or bake immediately: 350-degree oven for 20 to 30 minutes, or until top is hot and bubbly.

Original recipe available here.

3 Ingredient Breakfast Cookies

It’s been a long time since I’ve written.. too long. A lot to catch up on.. especially in baby world. But for now I’m posting a couple of my fav recipes lately that I don’t want to lose. Enjoy!

INGREDIENTS

1 cup oats
2 bananas

PREPARATION

1. Preheat oven to 350ËšF (180ËšC).

2. In a large mixing bowl, combine the oats and banana; mash banana and mix until well incorporated.

3. Add additional ingredients, should you desire (chocolate chips, peanut butter, walnuts, almonds, raisins, coconut).

4. Bake for 12 minutes.

5. Enjoy!

Stuffed Shells and Cheese

The best shells and cheese you will ever have. Thanks Jess!

These restaurant-quality, cheese-stuffed shells come together effortlessly and make feeding your family or a large holiday crowd easy.

  • Prep: 15 mins
  • Cook: 30 mins
  • Yields: 4-6 Servings

Ingredients:

  • 12 ounces Mueller’s® Jumbo Shells
  • 2 eggs
  • 2 containers (15 ounces each) ricotta cheese
  • 2 cups shredded mozzarella cheese
  • 1-1/2 cup grated Parmesan cheese, divided
  • 1/2 cup chopped fresh parsley or 2 tablespoons dried parsley
  • 1 tablespoon dried basil
  • 1 teaspoon salt
  • 3 cups spaghetti sauce

Directions:

  • Pre-heat oven to 350°F; spray a 9×13-inch baking dish with non-stick cooking spray and set aside.
  • Cook Jumbo Shells for 15 minutes; drain well, cover and set aside.
  • In a medium bowl, beat eggs lightly, then add in ricotta cheese, mozzarella cheese, 3/4 cup Parmesan cheese, parsley, basil, and salt. Stir well to combine.
  • Spoon about one tablespoon of cheese mixture into each shell and arrange filled shells in a single layer in the baking dish. Top with spaghetti sauce and sprinkle with remaining Parmesan cheese.
  • Bake 25-30 minutes or until internal temperature reaches 165-185°F.
  • Cook’s Tip: Use any of your family’s favorite sauces, including those with Italian sausage or ground turkey to make this dish heartier.

Chatbooks

screen-shot-2016-12-06-at-3-20-00-pm

If you follow me on instagram you know I take (and post) lots of pictures. I mean A LOT of pictures. I mean I do love my kids and think they are cute but the main reason isn’t so everyone will see my cute kids- its really so I can add all of these cute pictures to my kid’s photo books. About a year or so ago I stumbled upon Chatbooks and have been hooked every since. Chapbooks allows you to customize, create and print photo books in zero time. It’s quick, easy and super affordable. You can “subscribe” and get a photo book every 60 pictures of your instagram feed shipped to you for $8. Or you can do what I do and create your own book whenever you want.

I use Chatbooks to create photo books for our kids.. birth to 1 year, 1 year to 2 years and so on. The really nice thing about Chatbooks is you can search a specific hashtag in your account and it will pull all of the pictures you have posted using that hashtag. The means finding all of my son’s pictures from the past year in no time! If you forgot a picture or two or changed your mind about one you can also easily add or subtract pictures. The date is automatically included (but you can also remove that feature) and the caption is as well (but you can delete it if you want to). It’s such a simple (and did I say easy!) way to create custom photobooks that are an excellent quality.

I HIGHLY recommend Chatbooks. Check it out, use my referral code and get your first book free (6J46PC7V) and then let me know what you think! Enjoy!

*For reference, pictured above are 2 hardcover books of about 350 pages (they are also the two on the far right below). 366 pages is the photo limit for one book. The skinniest book in the center below is about 55 pictures and is the smallest I’ve made so far. 50241956530__186a1199-94dc-46ff-b310-a8f350211793

30 Months!

View More: http://rachelmelton.pass.us/harvey-2016

Our boy is 2.5 years old today! Wow how time flies. He is officially our little man and no longer a baby. It’s hard to believe how fast the time goes. Jude weights 29lb and is 36in tall. He wears 2T and 3T tops and bottoms (depending on the brand) – Carters he is mainly wearing 3T – pants are still a little long and Gap he is wearing 2T pants and both sizes in tops.

He is full on boy and loves to run and jump and climb. Lots of climbing and jumping! Bounce houses and climbing walls are some of his favorite things. He loves using his “skateboard” (kitchen step stool) to help make pb&j or pizza for dinner. He still loves his paci but only gets it at night time. He likes to talk about the potty a lot and knows he gets candy if he goes but he is still holding strong to those diapers and usually says “its broken” whenever we sit him on the potty to try. 🙂

He loves balls and trucks and so many of his toys. His favorite color is currently purple and his favorite shirt is Superman and favorite pjs are Christmas or spiderman with a cape! He is super sweet and hugs his sisters when he sees them in the hallway at school and always wants to know why they are crying or upset. He is a big helper and will bring them toys as long as they don’t want one of his!

Halloween was a big hit and we are still watching Toy Story’s and Mickey’s Halloween shows on repeat. Hoping we can transition to Thanksgiving and Christmas over the next couple of weeks.

I love our happy and growing boy!

Pumpkin Patch Palooza

I love fall. I absolutely love it. I’m not really into the pumpkin spice lattes and pumpkin breads and treats that most other people love- my thing is all the outdoor fall activities! There is so much to see and do and I’m a huge fan, especially when you have 3 kids under 3 years old to entertain on a regular basis. Fall means lots of free, or relatively inexpensive, activities for everyone to see and enjoy. So check out our review of the local farms we’ve visited so far . . .

Burt’s Farm

img_2156

Our first stop was to Burt’s Farm. We actually went here the last weekend in September. I’ve never been before but KH  had and suggested we avoid the crazy October crowds and hit this one early. Apparently the lines get incredibly long (even to get int he parking lot!) and with our little 3 that was not something we wanted to mess with.

Pumpkins – Burt’s has LOTS of pumpkins to choose from. All colors and sizes. They even have farm grown squash and other vegetables as well you can buy.

Hayride- They hayride at Burt’s is a MUST. Seriously the best one we’ve been on. Its about 20 min long and they literally have set something up every step of the way for you to see and experience. I don’t want to spoilt the fun but just know you won’t be staring at farmland or woods the whole time. My 8 year old niece said, “this is the best hayride I’ve ever been on!” and I absolutely agree with her. You can’t beat it. Cost is $5/person. 2 and under are free.

Activities – There really aren’t many other things for kids to do. There is a tractor they can sit on but no farm animals or other activities beyond the hayride.

Shopping- We went through the store pretty quickly but they have lots of locally made preserves, breads and other products as well as homemade crafts you can pick up.

Photo Opp- Lots of photo opp spots including this one below with the Burt’s Farm name in the background!

The Draw – The awesome hayride and the variety of pumpkins!

img_2224


Kinsey Family Farm

img_2929

Out second stop was Kinsey. It’s become an annual tradition as it was the first place we took our son to see Pumpkins when he was only 5 months old and the tradition has continued. It’s a small family farm with an overall great experience.

Pumpkins-  Kinsey has a good amount of pumpkins to choose from, just not as many as Burt’s. Some white ones as well and lots of different sizes.

Hayride- Good hayride takes you around the farm property where you get to see the animals as well as the Christmas tree area. Cost is $2/person. 2 and under are free.

Activities- The farm includes goats and cows which you can feed for a small price to buy the food. You can bet them for free 🙂

Shopping – There is a very small store with jared preserves, honey, pumpkins breads and even a couple t-shirts.

Photo Opp – Plenty of nature spots around the farm and with the pumpkins and hay bales.

The Draw- Kinsey is smaller, easier to get in and out, and a shorter drive than most other places. We like it for the “ease” factor.

img_2976


Warbington Farms

img_7097

Our third stop was Warbington Farms. We went earlier in May to go strawberry picking and had a great time. This past weekend they had a Pumpkin Palooza with lots of activities and fun for the whole family. Warbington is the only one that charges to actually get in the farm but there is lots to do there. Cost is $10/person. 2 and under are free.

Pumpkins- A very small area sectioned off. I’m not sure if they actually grow the pumpkins there. It’s separate from the rest of the farm.

Hayride- The hayride was VERY short. The price is included in the cost of visiting the farm. We got to see more of the farmland and got to see them feed the cows but that was about it. They hayride is also not actually a hayride but a ride on bench seats on the back of a tractor.  Cost is Free.

Activities- LOTS of activities. They had multiple bounce houses, a giant blob bouncy, slides, a corn bin where kids could get in and jump around among, a corn maze, vendors selling items, face painting, as well as a petting area where we got to pet a 5 DAY OLD cow! So sweet! Couldn’t believe he was only 5 days old! We also got to pet some goats and a big. Bring a good stroller if you have little kids. The activities are all within walking and sight distance but you might need to push around the little ones.

Shopping – When we went there were vendors selling some of their crafts and local items however generally there is no shopping. Just a concession area with some food and drinks for sale. (During strawberry season they sell homemade strawberry ice cream which is AMAZING! but that’s just in the summer!)

Photo Opp – There were multiple picture cut outs to stop and get a picture as well as a sign by the entrance.

The Draw- While its a bummer its so expensive there really is a TON to do for kids and its a short drive as well – just off exit 17 on 400.

img_7202-copy-final