9 Months!

IMG_2510-1Our boy is 9 months old today! I can’t believe it! (Guest appearance in the picture by our sweet pup Toby 🙂 ). Our 6 lb 12 oz little baby has now grown to 18 lb 10 oz! Time seriously has gone by so so fast. I’m trying to hold on to each little memory as best as I can while watching him learn and grow and discover everything around him. This boy can sit completely on his own, he loves to stand, roll, talk, SMILE. He loves people, sleep, eating his bottle and fruits (not so much veggies!) and being active- pulling up on our fingers and raising his arms out or up to be held (LOVE that by the way!) He is not at all interested in crawling. I honestly think this boy will walk before he crawls!

He is in the mid percentiles for height (28.25 in) and weight but fits well into 12 month clothes and 6-12 month clothes. It’s still funny how “off” different brands are. For some stores his size is still considered a “baby” while others he fits in “toddler” clothes- it really is baffling how different each store and brand really are.  In Carters he wears 12 month, Koala Baby 18 month, Gap and Old Navy 6-12 month. We are all over the place but I think I’ve finally gotten it down and resisted the urge to buy too much “ahead of time” not knowing what size we will be in during what season.

I am absolutely loving this season and loving how interactive our little man is. He is such a treasure and we are so thankful for his addition to our lives!

Valentine’s Sugar Cookies

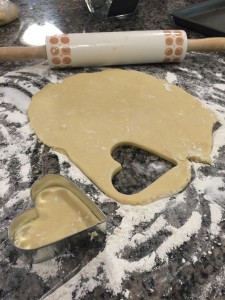
IMG_2282I’m not the kind of person that needs an excuse to bake something new or a holiday to feel inspired to try my hand at a special dessert but when the opportunity presents itself I love to seize it! I stumbled upon this tasty recipe, got the two thumbs up from my hubby that it sounded good and decided to give it a whirl. Definitely a different spin on traditional sugar cookies. They are a tasty treat that is almost borderline with a shortbread cookie but are so good you’ll be going back for more. Give them a try and tell me what you think! (Warning this recipe does require some down time in the fridge so you’ll have to plan ahead with this one.)

In one bowl combine:

  • 2 3/4 cups all purpose flour
  • 3/4 tsp baking powder
  • 1/4 tsp. each baking soda and table salt.

In a second bowl beat:

  • 1 1/4 cups sugar
  • 2 sticks unsalted butter
  • 1/3 cup sour cream
  • 1 egg
  • 1 tsp pure almond extract

IMG_2258Directions:

  • Combine the two mixtures; beat on low speed until combined.
  • Divide dough into two portions.
  • Wrap each portion in plastic and chill several hours or overnight.

After several hours:

  • Preheat oven to 350.
  • Spray baking sheets.
  • Roll one dough portion on floured surface to 1/4 inch thick.
  • Cut out desired shapes with your choice of cookie cutters (In this case Valentine’s Day hearts of course!)
  • Place onto cookie sheet.
  • Repeat with remaining dough
  • Bake cookies until edges are set and bottoms are golden brown (about 10 minutes).
  • Eat warm or cool on a cooling rack and then decorate cookies with icing & top with sprinkles!

Icing:IMG_2260

  • 2 cups confectioners’ sugar
  • 3 tbsp. milk
  • 1 tsp. vanilla extract to taste

Original recipe available here.
 

Bittersweet

IMG_2224This is my reading spot. For over a year after we moved into our home I dreamt and planned the perfect spot and the perfect chair to sit and read – my own little oasis in our home. It’s the perfect spot to lean back with my legs propped up, blanket snuggled around me and coffee and a good book in each of my hands (for a brief hour during nap time of course – but I’ll take whatever I can get).  This morning I’ve found myself diving into Shauna Niequist’s book bittersweet: thoughts on change, grace, and learning the hard way. A friend recommended this book to me and without knowing anything about it other than that title I instantly ordered it (thank you Amazon Prime) and dove in. I would normally wait and write a book review after I finished the book but after only a couple chapters in I couldn’t resist. Over the past 8 months we welcomed our first born and joy into our home, after a 3 month (which I highly recommend!) maternity leave at home I tried to figure out the balance between work and home and being an amazing wife and mother and friend and employee (not to mention daughter, sister, boss, etc). Shortly thereafter my husband quit his job to start his own business – a personal goal and dream of his – and around the same time my boss and dear friend of 8+ years made the tough decision to move himself and his family thousands of miles away to Arizona. One of my friends and co-workers announced she was leaving and another has begun plans to follow her husband to Mississippi. To say I was experiencing change in my life would be an understatement. I was experiencing A LOT of change and with it I became beyond sad and overwhelmed by everything happening at the exact same moment in my life. So much so that it has taken me months to even begin to write about it. Life and all of its changes instantly became bittersweet.

Bittersweet is the idea that in all things there is both something broken and something beautiful, that there is a sliver of lightness on even the darkest of nights, a shadow of hope in every heartbreak, and that rejoicing is no less rich when it contains a splinter of sadness…Bitter is what makes us strong, what forces us to push through, what helps us earn the lines on our faces and the calluses on our hands. Sweet is nice enough, but bittersweet is beautiful, nuanced, full of depth and complexity. Bittersweet is courageous, gutsy, earthy…

So that is where I’ve found myself. Right in the middle of bittersweet. Trying to be hopeful about that sliver of lightness but still trying to find my way out of the shadows. Change had taken over and my initial reaction was to resist it, until I started to learn the hard way that I needed to embrace it.

This is what I’ve come to believe about change: it’s good, in the way that childbirth is good, and heartbreak is good, and failure is good. By that I mean that it’s incredibly painful, exponentially more so if you fight it, and also that it has the potential to open you up, to open life up, to deliver you right into the palm of God’s hand…when life is sweet, say thank you and celebrate. And when life is bitter, say thank you and grow. 

And so that is why I wanted to write this post, as an encouragement for anyone going through a lot of change and wondering “how in the world am I ever going to get through this!” I’d love to encourage you to join me in reading bittersweet and then let me know what you think..until then I’m just going to stop trying to fight it and instead I’m going to choose to say thank you, and grow.


The Order of Solids Part 2

Back in November I started a log of what solids our little man was enjoying those first few weeks he attempted to eat solids. It definitely look us a good month (or more!) to get going but he’s finally up to eating 3 solid meals a day and loving it.  Here’s my updated solids list, broken down by age, as recommended by Sage Spoonfuls.  I still highly recommend this book for anyone looking for any easy resource on how to make their own baby food and what order to introduce each food safely.

Foods safe for 4-6 month olds (we started at 6 months):

  1. Organic Oatmeal mixed with breastmilk served warm
  2. Banana – yellow, ripe with some brown spots – mashed and warmed
  3. Sweet Potato- firm – steamed & mixed with breast milk or formula served warm
  4. Apple- fresh red – steamed and pureed
  5. Avocado- even green color and give a little when squeezed – pureed
  6. Carrot – organic, orange, without cracks- steamed and pureed (The Favorite so far!)
  7. Peas – frozen- steamed and pureed
  8. Zucchini – organic, medium sized and even green in color  – steamed and pureed
  9. Pears – Bartlett or Anjou, slight soft – steamed and pureed (A Favorite!)
  10. Butternut squash – firm to touch and heavy for their size – roasted in oven for 45 min

Also safe but skipped for now: parsnip, pumpkin, potato

Foods safe for 7-9 month olds (we started around 8 months):

  1. Blueberries – fresh, organic – steamed and pureed
  2. Broccoli- fresh -steamed and pureed
  3. Mango- frozen – steamed and pureed
  4. Green Beans – frozen – steamed and pureed
  5. Peaches- frozen- steamed and pureed
  6. Cauliflower – frozen- steamed and pureed

More to come!

World Market Wins

My husband and I both recently moved into new office space. He moved from our home to an outside office and I moved from one office building to another within my company. As a result we both were in the market for some new office furniture and decor to spice up our space. My go-to whenever shopping for anything furniture related is always Pottery Barn or Restoration Hardware (well actually the outlets for both) but this time we decided to take a trip out to World Market and see if we could come across any good finds and boy were we in luck!

For my office we found this Emerson bookcase and accessories as well as the Erin Cute-as-a-Button loveseat (notice the buttons!) I can’t handle it – I love them both so much! I’ve also gotten numerous compliments on them. I love how the bookshelf has an industrial, Restoration Hardware type feel but at a fraction of the cost. Such great finds at great prices (their furniture sale this weekend certainly helped!) And 10% off your entire purchase for all World Market Explorers (their membership discount). The only downside.. that these cute pieces weren’t going in our home! Guess i’ll have to settle for staring at them every day in my office instead :).

IMG_2142  Screen Shot 2015-02-03 at 7.32.11 PM

Also pictured:

Chicken Enchiladas

Yesterday was a super busy day. We got up early, headed to my office to put together a new book shelf I recently purchased, then back to my husband’s office so he could finish up some work, lunch with my parents and then a trip to Costco. We left the house around 10:00 a.m. and didn’t get home until after 4:00 p.m. – just in time to throw together some dinner for friends coming at 6:00 p.m. This is one of those great recipes that can come together quickly either last minute or you can put it in a pot and forget it until you’re ready..it’s also one of those that I make without a recipe and the quantities often change every time I make it..  I’ll try and capture it below as best as possible- I hope you enjoy it as much as we do!

Chicken Enchiladas

Ingredients:

  • 1 package tortillas (I like to use the Mission extra soft tortillas)
  • 3-4 chicken breasts (usually 1 chicken breast per person)
  • 2 cup shredded cheese (I like to use mexican blend or cheddar)
  • half and half
  • 1-2 jars of salsa (depending on size- you need enough to cover all of the chicken)*
  • 1-2 packets of taco seasoning (1 packet for every 2 pieces of chicken)*

Directions:

  • In a crockpot mix salsa and taco seasoning. Cook on high about 6 hours or low about 4 hours until chicken breaks apart easily with a fork. (*If you missed the window to use the crock pot you can also cook the chicken in a skillet on the stove and then mix in a bowl with red enchilada sauce. 1 can per 2 pieces of chicken then continue with directions below).
  • About 20 minutes out from your preferred dinner time…
    • Preheat oven 350 degrees
    • Shred chicken with a fork and mix in bowl with half of shredded cheese.
    • Fill each tortillas with chicken/cheese mix and wrap with the fold face down.
    • Pour half and half over the top of all enchiladas (this keeps the tortillas soft while baking).
    • Sprinkle remaining cheese over enchiladas.
    • Bake 10-12 minutes.
  • ENJOY!

IMG_6895 IMG_8942


Diaper Rash Remedies

For the last couple of weeks our little man had a rough case of diarrhea which caused an even rougher outbreak of diaper rash. We tried Aquaphor, Desitin, Desitin maximum strength and Butt Paste and nothing seemed to be working. I finally resorted to calling in the “moms” for help- one of my Facebook groups of neighborhood mom friends. Here are their recommendations for diaper rash:

  • Tori: “A&D ointment will start to heal it in a couple of hours!!! The same thing happened to my baby and we ended up changing his formula…..but his bottom was so raw it was bleeding! Also try using a wet paper towel very gently … Sometimes the wipes can make it worse. And warm baths help too! We also put him down for a nap on his tummy and kept his diaper open so it could air dry. The moisture in the diaper doesn’t help the situation either.
  • Sarah: “We used a concoction of Desitin, LotriminAF, and Neosporin. Equal amounts. Definitely recommend. I prefer the maximum “rapid relief” Desitin, and if that doesn’t work, this is our miracle spread. If diarrhea starts, we try and start aquaphor to prevent a bad rash.
  • Emily: “Coconut oil is my go-to for just about everything, including diaper rash. It’s antibacterial and anti fungal. It’s also inexpensive and can be used for many more things other than diaper rash treatment.

In the end we ended up trying A&D ointment (specifically for treatment of diaper rash – there is more than one kind) and it finally worked! I also tried letting him “air out” a little after wiping and before applying the ointment. We also did a couple 20 minutes sessions of him laying on a towel and completely airing out. Result = Success!

Screen Shot 2015-02-03 at 7.20.08 PM


Chocolate Lasagna

Some of my extended family is coming in to town tomorrow to meet our little man for the first time. Special occasions call for special meals and so my mother is making her homemade lasagna and meatballs. (I’ll be sure to get her recipe soon & post it- its legit, straight out of Italy, homemade yumminess). In honor of the occasion I decided to make some chocolate lasagna for dessert to go with the theme. Can’t wait to dive in!

Chocolate Lasagna

INGREDIENTS

  • 1 package regular Oreo cookies (about 36)
  • 6 Tablespoon butter, melted
  • 1- 8 ounce package cream cheese, softened
  • 1/4 cup sugar
  • 2 Tablespoons cold milk
  • 1- 12 ounce tub Cool Whip, divided
  • 2 – 3.9 ounce packages Chocolate Instant Pudding
  • 3 1/4 cups cold milk
  • 1 and 1/2 cups semi-sweet chocolate chips

IMG_1918DIRECTIONS

  1. Begin by crushing 36 Oreo cookies. You can use a food processor for this or crush by hand until they are fine crumbs.
  2. Transfer the Oreo crumbs to a large bowl. Stir in 6 tablespoons melted butter. When the butter is distributed, transfer the mixture to a 9 x 13 inch baking dish. Press the crumbs into the bottom of the pan. Place the pan in the refrigerator while you work on the additional layers.
  3. Mix the cream cheese with a mixer until light and fluffy. Add in 2 Tablespoons of milk, and sugar, and mix well. Stir in 1 cup Cool Whip. Spread this mixture over the crust.
  4. In a bowl, combine chocolate instant pudding with 3 and 1/4 cups cold milk. Whisk for several minutes until the pudding starts to thicken. Use a spatula to spread the mixture over the previous cream cheese layer. Allow the dessert to rest for about 5 minutes so that the pudding can firm up further.
  5. Spread the remaining Cool Whip over the top. Sprinkle chocolate chips evenly over the top.
  6. Place in the freezer for 1 hour, or the refrigerator for 4 hours before serving.

Treats for Toby

IMG_5771I’m taking advantage of my day off today and giving our pup some extra loving by making some of his favorite dog treats. I don’t make homemade treats very often (usually once or twice a year for special holidays) but with our little man in the house Toby doesn’t get as much attention as he used to and so its nice to spoil him when we can. So here is a recipe for some homemade dog treats that are Toby approved (and hey its all natural and people ingredients so you can even eat them too!)

Toby’s Treats

Ingredients
  • 2½ cups whole wheat flour
  • 2 eggs
  • 1 cup canned pumpkin
  • 2 tablespoons peanut butter
  • ½ teaspoon salt
  • ¾ teaspoon ground cinnamon
Instructions
  1. Preheat oven to 350 degrees
  2. In a stand mixer, mix together the flour, eggs, pumpkin, peanut butter, salt, and cinnamon
  3. Add water as needed to help make the dough workable, but the dough should be dry and stiff.
  4. Roll the dough into a ½-inch-thick roll. Cut into ½-inch pieces (or use the cookie cutter of your choice).
  5. Bake in preheated oven until hard, about 40 minutes.

Original recipe available here.
Getting Started: Homemade Baby Food

Screen Shot 2015-01-21 at 10.32.53 PMLast night I posted this picture of my latest creation (steamed and pureed broccoli) for my little man’s breakfast and it prompted a lot of questions about my baby food making process. I’ve found it to be a pretty easy process so far (once I figured out his schedule with both bottles and baby food) and so I haven’t found the need to buy baby food yet which has saved us a ton of money in the long run. Besides, don’t you wonder what they put in those baby food jars which make them last so long? I think I’ll stick to giving our baby pure nutrition and simple ingredients for now. So to get started I usually make and introduce 1-2 new food items a week (depending on how much I have in the freezer and what I have going on that week). Last week was blueberries. This week we are introducing broccoli! Here’s a quick look at everything I use to make baby food:

Screen Shot 2015-01-21 at 10.34.16 PMBAEBA Babycook Pro:

Ok so yes, you can use your Vitamix or a regular blender or food processor however most everything I read about making your own baby food encouraged steaming instead of boiling the food to preserve the nutrients. Baking is also another good option but who has time to preheat and use your oven every night? Also when making small quantities it just seems simpler in my opinion for clean up and for blending to just have one small machine that does it all instead of steaming in a basket and then transferring to a large, oversized Vitamix. It took a little convincing to explain to my husband why I “needed” this but now he is 100% on board and we both love it!

Screen Shot 2015-01-21 at 10.34.26 PMSage Spoonfuls Cookbook

I don’t know how I would have even started without this gem! This “cookbook” goes through the order of solids (yes, there are certain foods appropriate by age for your baby), how long they need to be steamed, if you need to buy organic or if fresh or frozen is ok. It also talks about the health benefits of each different food as well.  I literally use this book for every new food I introduce to our little guy. If you don’t want to buy a book I’ve also heard a ton of great things about the Wholesome Baby Food website. It also lists the age appropriate for each food as well.

Screen Shot 2015-01-21 at 10.34.34 PMOxo Tot Baby Blocks Storage Containers – 2 oz

For food storage I recommend these Oxo Tot containers. They are freezer and dishwasher safe. I like them better than ice cube trays because I can grab one for daycare and go and not have to defrost or pop out food and move it to different containers. I can literally store and feed from these plastic containers. Perfect.

Screen Shot 2015-01-21 at 10.52.53 PMMunchkin White Hot Safety Spoon

Ok so yes I do realize that you should be able to judge how   hot or cold your baby’s food is without a spoon that turns white when it gets too hot.. but why guess… why wonder. These spoons are just another added safety net in protecting my baby and helping make life just a little easier.


Screen Shot 2015-01-21 at 10.58.42 PMBumkins Waterproof Starter Bib 

We introduced waterproof bibs when we started feeding solids instead of using the cute cloth Aden + Anais cloth bibs I use when giving our baby a bottle. These bibs are waterproof and make clean up a breeze. I simply run them under the sink after mealtime and then hang to drive. They require little fuss, which I love, and still have lots of cute patterns.

Screen Shot 2015-01-22 at 7.00.57 AMCulturelle Priobiotics for Kids

About a month after we started solids our little guy had constant boopy diapers (about 6-8 a day) and developed a horrible diaper rash. Our pediatrician recommended giving him a probiotic once/day to help his body process the foods he was eating. This particular probiotic helps to “support a child’s health by fostering the proper balance between good bacteria and the non-beneficial bacteria that resides in the gastorintestinal tract…it alleviates occasional digestive distress while supporting a child’s natural defenses.” This particular type comes in the form of a solid which we mix half of a packet a day in with some of his cold fruit.

Screen Shot 2015-01-21 at 11.04.33 PM

Fisher-Price Healthy Care Deluxe Booster.

Last but not least is our high chair. Our kitchen is probably average size but it doesn’t really have a great corner or a lot of extra space for a large or bulky high chair. We have a small, round table with 4 wooden chairs in our kitchen and we decided early on to designate one of these chairs for our little man’s “high chair.” I’ve loved this seat. It’s a great space saver, its plastic (which comes in handy for so many reasons), and its portable. If you have extra guests and need the seat you can just unclick the two straps and voila! no more high chair. We’ve also taken this to the grandparents house and to restaurants. Portable, functional and pretty darn attractive- I’d say that’s a win!